Related Posts Plugin for WordPress, Blogger...
Showing posts with label tutorials. Show all posts

Wednesday, November 26, 2014

Studio Photography : High Key Portraits


Today I just want to talk about how to shoot a simple high key portrait, as seen with the pictures above. You just need a large softbox infront of the subject and small lights to overexposed the background. High key can be a simple fashion shot for any apparel as it highlighted the subject. Thanks!!


read more..

Friday, October 25, 2013

Basic Poses for Model Shoot

So here I got some useful information to share with you guys. The basic poses that we usually do in studio or even outdoor. Good Luck!!


read more..

Wednesday, February 6, 2013

Tiny Planet using Android 4.2 device


Hello guys, it's been a while now since Google released their new device family, the Nexus 4, 7, and 10. I am impressed with this because the devices can receive update right after Google release new OS version as I writing this,  Android 4.2.1 Jelly Bean.


The good thing from this version of OS, it give creative Google street view ability straight from phone. Means  you can create a 360 street view with just a Android device, not with old way. About quality, it not as perfect as doing it with DSLR but it is okay for me as long it can do the job done.

This post I want to show you guys what interesting view we can do with the 360 panorama image, Tiny Planet. Below are some of my experiment with the new toy I've got, Nexus 4 that come out from factory with Android 4.2 and updated with 4.2.1 right now. As you can see update is straight to your phone as Google released it. That is one fancy thing about it.


read more..

Tuesday, January 8, 2013

Car Photography : Light painting with minimal gear


Hello!! and happy new year 2013 guys!!. For your information it's been two years since my 1st post here on blogger, so many thing I've learn thanks to Mr.G(Google).


And!! this time around I've tried a new skills, light painting. I do that on my cars. So here is how and what we need to get to done this project.

First thing first, get a Dslr with a kit lens will do as all my photo done here captured just with Nikon D3100 and Nikon 18-55mm kitlens. Yes you will need a tripod because we use long exposure setting here. If your camera support wireless triggered it is very useful right now. A softbox and a continues light, for my case I use head torchlight mounted DIY on my softbox.

Go to a dark place where is minimum light source can hit the car, park your car, assemble the tripod, get the camera ready. Find the good angle and try to imagine how the light gonna look like afterward. Get focus on by giving the car some light. This will make auto focus more easier to catch the focus point of your car. And for the setting I use mostly ƒ8, ISO 200, and depends on what I paint 20 to 30 seconds exposure. Start shooting with your desired light direction. Voila!! your done dude!! and this is my first time playing light painting. So I assume you guys can do better, there is tone of examples on the net.


read more..

Wednesday, October 5, 2011

HDR with one raw file (Psuedo-HDR)

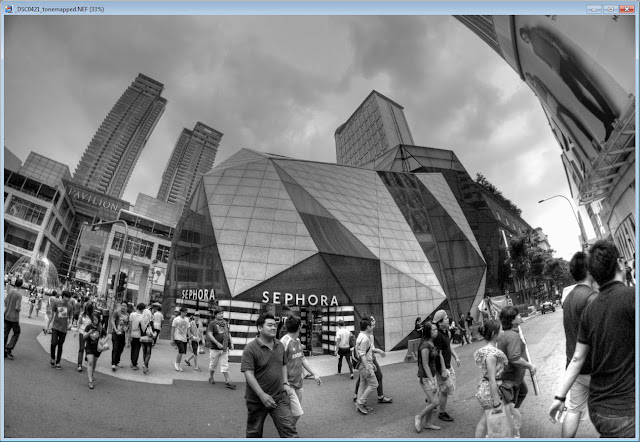
High Dynamic Range is one of famous photography that been used to enhance the detail in the shadow and showing a correction at the over exposed environment like sky. Today I going to share with you how to make a Psuedo-HDR that is high dynamic range of photographic just using one raw file. First thing we need to do this of course prepare these softwares :
  • Photomatix
  • Photoshop
  • Noise Professional
  • Sharpener Pro
1. Take pictures. This is only one simple images I took for this tutorial.


2. Drag the raw file to Photomatix. When you done it, a pop up window will appear like below asking to reduce noise, chromatic aberration white balance and color space. I just leave it to default and just click okay. Photomatix will remind you that this is not a true HDR.

3. In Photomatix version 4 and above, there is a preset ready for the users. You can choose what type of preset you want to try but this time I will try the B&W preset.

4. After you choose the preset that you want, you can see the left side of the window there is a slider that easily slide from left to right. This is when the magic start as what you adjust is what you will get. It is simple, you can try every slider and see what the slider will effect to your image.

5. You can click on the image to zoom it to see detail of your image. You can see from this shot, how noise are famous for HDR even in one shot and: )

6. This is what I get for: ). save it as tiff or jpeg if you prefer.

7. Drag the transformed image to you Photoshop for next editing. HDR is well know for noise that it has produced, the solution is to get rid of it using noiseware professional plug in or you can use traditional methods of noise reduction what Photoshop provided.


As you can see screen shot below, how well this plugin working.


8. Next I use Sharpener Pro for make it little sharpening, or you can use unsharp mask.

9. And for the last step, I add a new layer and made it a vignette. You can do what you want :) and voila you're done!!


I am prefer to shot HDR in multiple image but one raw image sometimes help me to get an HDR fast, for example the image I choose. I shot it in the middle of a road and when traffic light is green for pedestrian or maybe when you want to shoot HDR in unexpected environment  that you haven't ready your tripod :) Enjoy and happy practicing~


read more..

INSPIRATION

VISIT COUNTER

SOCIAL LINK

  © Copyright by hendrikphoto 2015 | My Flickr page

Back to TOP